

"Competitor-obsessed startups rarely win. Customer-obsessed startups always win." Exotel's Voice Platform handles millions of calls per day, among which 35% of total calls are recorded and uploaded to the cloud for long-term storage and customer access. In the current age of data, call recordings are...
A few years ago, when we did our first architecture redesign, we needed to migrate our database. Naive and inexperienced with deployment, we decided to use the “quiet time” late at night to do the migration. We had fewer customers and assumed that our usage would be almost nil and that it was ideal to do our “maintenance” during this time. We sent an email to our customers letting them know about our scheduled maintenance downtime. We also personally called up users who we knew used our system at night and assured them that we would be up and running in a couple of hours.
And then Murphy happened, again, and again. The DB instance just refused to come up, one lead to another and we were firefighting for a couple of more hours and we had exceeded our promised maintenance window. Our customers were unhappy and we were deservedly flogged. We apologised again and vowed never to repeat it, but that was the last time we could even dream of the luxury of quiet periods. We grew fast and different customers with different use cases came on board. A downtime of a few minutes had our support lines buzzing. And this is a rather happy problem to solve.
Ever since, we devised a number of strategies to improve our uptimes and take care of planned maintenances without affecting our availability. The toughest has been the database migration. Migrating huge databases running to gigabytes and terabytes is a different beast altogether. And managing something of this scale without any downtime is a huge challenge. But it’s one we’ve managed to crack with success. And this is how we plan and manage our MySQL database migration with no downtime.
Prep work
The need for database migration might have multiple reasons – adding a new column to a large table, moving to better hardware or increasing the storage on your hardware etc. Keeping the why’s aside, let’s look at the how’s and lay out a few assumptions.
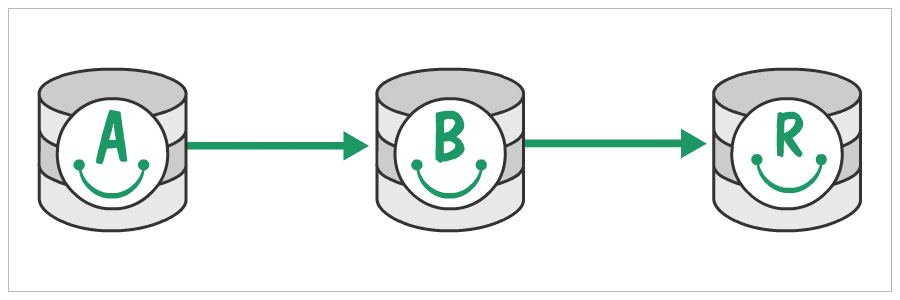
You have a machine A (10.10.10.10) which has a replica server R (10.10.10.20). And you have a new machine B (10.10.10.30) to which you need to migrate the database. At the end of this migration, B will be the master database with R still remaining the read replica, but off B.
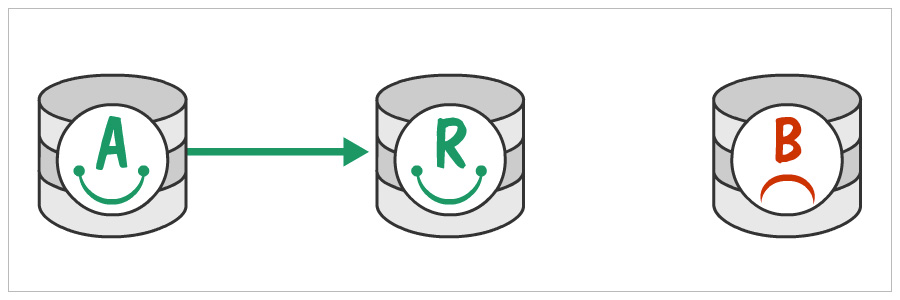
To get started, stop replication by issuing the following command on R
mysqlonR> stop slave;
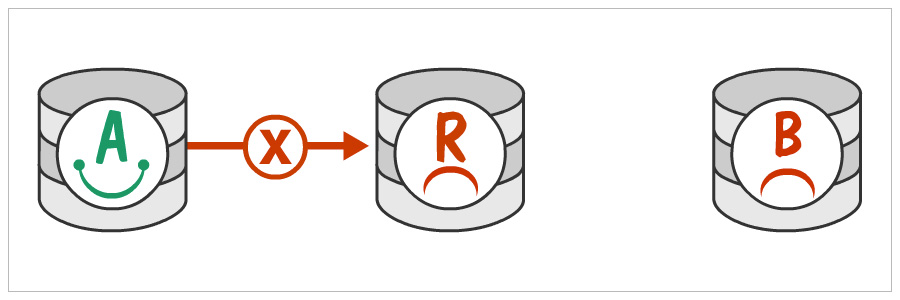
Copy ‘em Over
Copy over the MySQL Data from R to B. The usual place to look for this data is in /var/lib/mysql/ but it might vary based on your config. You can get this location from your config file. In case you are hosted on AWS, you can simply create a snapshot of your MySQL drive, create a volume from that snapshot, attach it to instance B and mount this new volume to /var/lib/mysql. What we are going to do is to make B a read slave of A, and R a read slave of B. And when B and A are in sync, just do away with A.
Getting the new one started
Now, it’s time to start mysqld on B with replication with A disabled and logging of slave queries enabled for R to sync up later. Add the below lines in /etc/my.cnf
binlog_do_db = testdb
log_bin = /var/log/mysql/mysql-bin.log
server-id=4 # server-id should be unique across servers. So, make sure that it is uniquerelay-log = /var/lib/mysql/slave-relay.log
replicate-do-db = testdb # this is to do the replication to local from A
skip-slave-startbash@B[10.10.10.30]#sudo service mysqld start –skip-slave-st
art
Sync with the Old Master
Since we just copied over the mysql database completely, the old configuration to sync with A would still remain. Before you start replication with A, you need information about the point to which the sync was complete with A.
mysqlonB> show master statusG
*************************** 1. row ***************************
File : mysql-bin.003471
Position : 107
Binlog_Do_DB : testdb
Binlog_Ignore_DB :
1 row in set (0.01 sec)
The File and Position are the ones of interest here. Once you have this information, start the sync of B with A.
mysqlonB> start slave;
Now you have the new machine B acting as a replica for A.
Show the Old Replica(R) some love
Now you need to enable replication between B and R (B as master and R as the replica).
Create replication user for server R in B using below command.
mysqlonB> GRANT REPLICATION SLAVE ON *.* TO ‘replicationuser’@’10.10.10.20’ IDENTIFIED BY ‘strongpassword’;
ON the R machine, change the master to I and also change the log file & position that you noted down earlier using below command.
myslonR> CHANGE MASTER TO MASTER_HOST=’10.10.10.30′, MASTER_PORT=3306, MASTER_USER=’replicationuser’, MASTER_PASSWORD=’strongpassword’, MASTER_LOG_FILE=’mysql-bin.003471′, MASTER_LOG_POS=107;
Start the replication in instance R now.
mysqlonR> start slave;
Now what you have is a daisy chain from A to R to B.
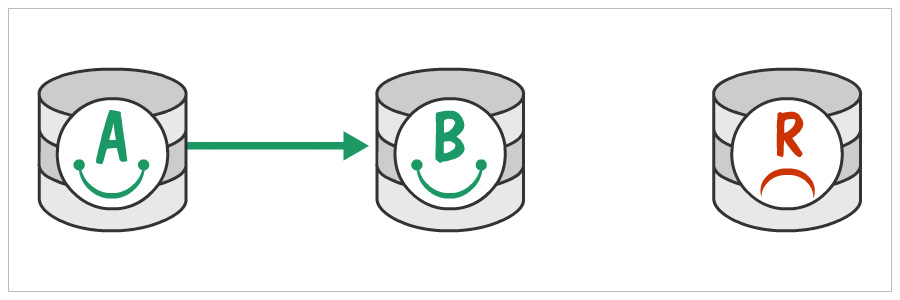
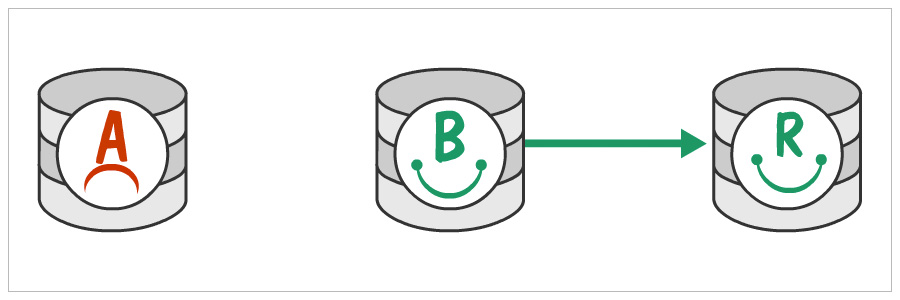
Let Go of the Old Master
When A and B sync up, you could just throw away A by pointing your application to B. If you have done your app design well, this would be just a config change. If not, tough luck changing them in all places. Voila, now you have a new and shiny database machine answering to all your reads and writes.
We did this recently too when one of our databases was growing at a rapid pace and we were running out of space. There might be other ways to do this. If you do it in a different way do let us know in the comments section.


 +91-8088919888
 +61-2-8073-0559
 +62-215-098-4960
 +60-3-2771-2799
 +65-6951-5460